Wrong window size ruins schedules, budgets, and patience.
This guide explains 24×48 (2×4) windows in plain words: what the size means, how big to frame the opening, which materials and operations to choose, what they cost, and how to install them right.
Stick with me. You will pick the right spec, order with confidence, and install without rework.
What does a 24×48 window size mean?
Small size errors cause big jobsite problems.
A “24×48 window” means the finished frame is about 24 inches wide by 48 inches high. It is the unit size, not the hole in the wall, and it excludes trim and fins.
Terms that matter
| Term | Plain meaning | Why it matters |
| Unit size | Actual frame W×H | What you order |
| Rough opening | Framed hole in wall | What you build |
| Daylight opening | Visible glass area | Light + blinds fit |
| Overall with fin | Frame plus nailing fin | Sheathing layout |
Most “24×48” units measure a bit under the label (for example, 23½″ × 47½″). That small reduction lets the unit slide into the rough opening with space for shims and sealant. Catalogs also list “2/0 × 4/0” (feet and inches). It equals 24 by 48 inches. When you compare quotes, match unit size to unit size. Do not mix it with daylight opening or overall size. Write both the call size (2×4) and the exact unit size on your plans. This simple note prevents the classic “fits on paper, stuck in the field” moment.
What rough opening fits a 24×48 window?
Tight openings bind frames. Loose gaps leak air and water.
Aim for a rough opening ½″ to ¾″ larger than the unit in both width and height. That space allows shimming, squaring, and a continuous air-and-water seal.

Quick reference
| Labeled size | Typical unit size | Safe rough opening |
| 24″ × 48″ | 23½″ × 47½″ | 24″ × 48″ |
| 2/0 × 4/0 | 23⅜″ × 47⅜″ | 24″ × 48″ or 24¼″ × 48¼″ |
Frame the header level and the sill dead flat. Check diagonals; they should match. Use composite or cedar shims in pairs so pressure stays even. Leave a consistent gap (¼″–⅜″ each side) for low-expansion foam and backer rod. For out-of-plumb walls, increase the gap slightly so you can true the unit. Replacement installs inside an existing frame follow the same idea: measure three widths and three heights, order to the smallest numbers, and plan to shim the rest.
Are 2×4 windows the same as 24×48 size?
Different labels confuse buyers and crews.
Yes. “2×4 window” uses feet. It means 2 feet by 4 feet, which equals 24 by 48 inches. Some spec sheets write “2/0 × 4/0.” It is the same call size.
【plan view showing 2/0 x 4/0 callout next to 24×48 note | Google Image: “2-0 x 4-0 window call size drawing”】
Use the call size for quick selection. Use the unit size for layout and purchase orders. If a vendor only lists daylight opening, ask for the frame drawing. Never assume. One email today prevents an expensive return later. On multi-trade jobs, place a label next to each opening that shows call size, unit size, and rough opening. Everyone reads the same numbers, so no one makes a bad cut.
New construction or replacement 24×48: which to choose?
Two paths, two sets of pros and cons.
Pick new-construction when studs are open or the old frame is bad. Choose replacement when you keep the frame and want speed. New-construction seals best; replacement is fastest.

Quick chooser
| Situation | Best option | Why |
| Open wall or full gut | New-construction | Fin + flashing = clean water plane |
| Historic trim to keep | Replacement | Saves exterior work |
| Frame is out of square | New-construction | Resets geometry |
| One-day condo swap | Replacement | Minimal disturbance |
New-construction units include a nailing fin. You set them from the exterior, then shingle-lap flashing with the weather barrier. This gives the most reliable water path. Replacement units slide into the old frame from inside. They avoid siding work, but the glass area can shrink and air sealing depends on the old frame being sound. If budget allows and walls are open, pick new-construction for lifespan. If time is tight or exterior finishes are delicate, pick replacement and plan a careful interior air seal.
Which frame materials work best for 24×48?
Material sets performance, look, and care.
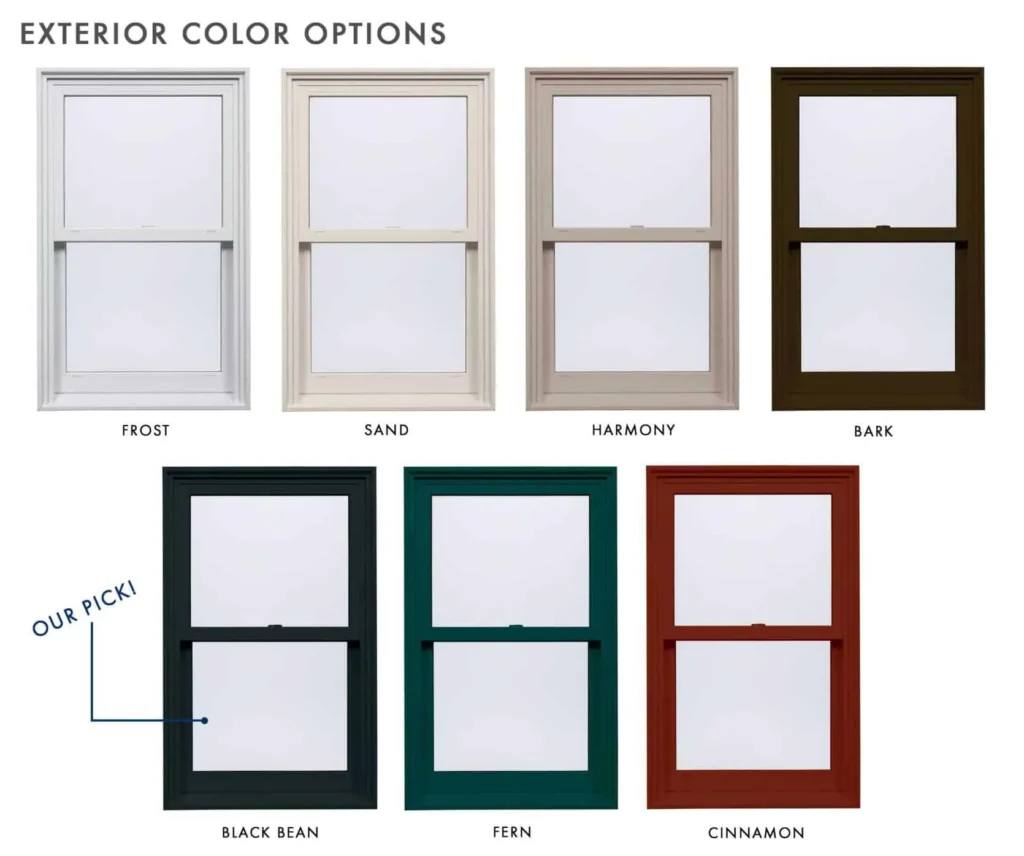
Vinyl (uPVC) and fiberglass give the best mix of price and insulation at this size. Wood looks warm and classic but needs paint or cladding. Aluminum suits modern looks if it has a thermal break.
If you’re looking for window solutions for your project, visit our Window and Doors page on our website for answers. Contacting us can expedite your project.
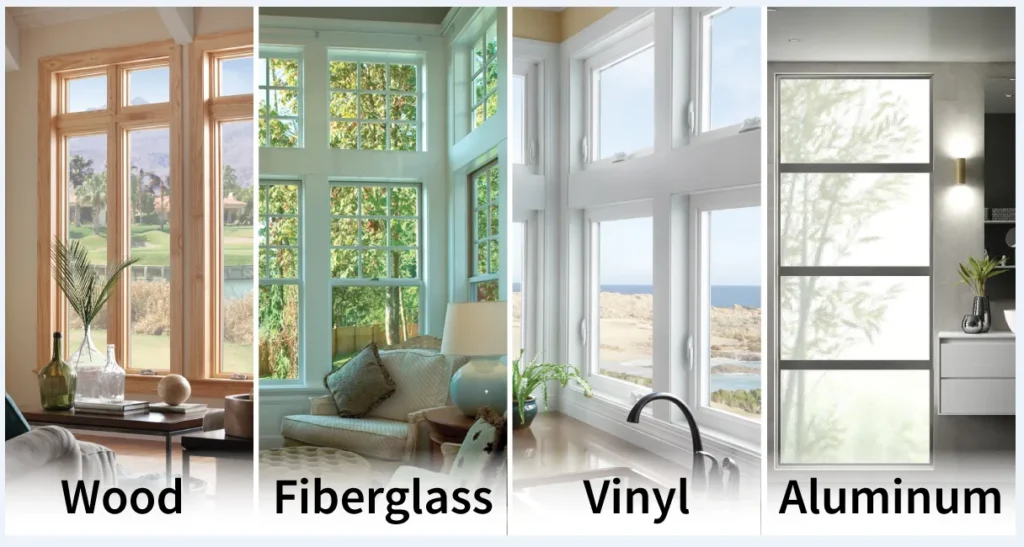
Material snapshot
| Material | Insulation | Maintenance | Strength | Notes |
| Vinyl | Very good | Low | Good | Welded corners, good value |
| Fiberglass | Excellent | Low | Excellent | Rigid, slim profiles |
| Wood | Good | Medium–High | Good | Paint or clad outside |
| Thermally broken aluminum | Fair–Good | Low | Excellent | Needs thermal break in cold zones |
Glazing matters as much as frames. Double-pane low-E argon is the common sweet spot. Triple-pane improves U-factor but adds weight; check hinge and balance ratings if you choose casements or double-hung. Ask about warm-edge spacers to limit perimeter condensation. Dark exterior colors need heat-stable resins or coatings to avoid warping under strong sun.
Single-hung or casement: which 24×48 opens better?
Operation changes airflow, sealing, and cleaning.
Casements catch breezes and seal on compression gaskets, so they leak less air and ventilate more. Single-hung units are simpler, cheaper, and common at 24×48 but move less air.
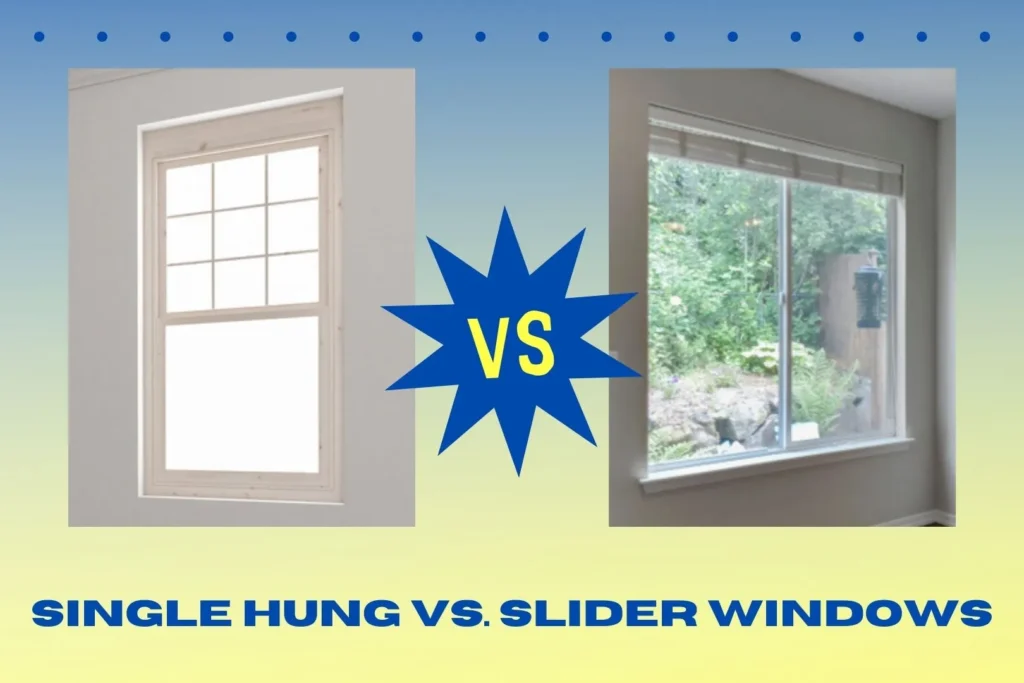
At-a-glance
| Type | Ventilation | Air leakage | Cleaning | Cost |
| Casement | Excellent | Low | Easy (inside screen) | $$–$$$ |
| Single-hung | Moderate | Medium | Moderate | $–$$ |
| Double-hung | Moderate | Medium | Easy (tilt) | $$ |
| Awning | Good | Low | Easy | $$ |
Pick casement for bedrooms needing airflow or for walls where you want the tightest seal. Pick single-hung where budget is tight or style must match other windows. For small baths, awnings vent in rain without dripping inside. Always check exterior clearance for swing windows, and confirm egress rules before you rely on any unit as an escape path.
What energy ratings should 24×48 windows meet?
Labels predict comfort and bills.
Aim for U-factor ≤ 0.30 and SHGC that fits your climate (≈0.25–0.40). Look for low-E coatings, argon fill, warm-edge spacers, and air-leakage ≤ 0.3 cfm/ft².

Reading the sticker
| Metric | What it means | Target |
| U-factor | Heat loss (lower = better) | ≤ 0.30 |
| SHGC | Solar gain (lower blocks heat) | 0.25–0.40 |
| VT | Visible light | 0.45–0.60 |
| Air leakage | Draft through unit | ≤ 0.3 cfm/ft² |
Cold zones prize low U-factor and sometimes a higher SHGC on south walls for winter sun. Hot zones prize low SHGC to block heat. Ask where the low-E layer sits (surface #2 or #3) and match it to your sun exposure. The install finishes the job: backer rod, low-expansion foam, and a neat interior bead can beat a lab rating if you do them right.
Do 24×48 windows meet egress requirements?
Bedroom safety has clear rules.
Often no. Many codes require a net clear opening wider and taller than a 24×48 provides, plus a minimum area. Always check local rules before you tag any 2×4 window as egress.

Most codes set minimum clear opening width, height, and area (for example, ≥ 20″ width, ≥ 24″ height, and ≥ 5.7 ft² area for upper floors in many regions). A 24×48 casement sometimes passes if the sash opens fully and hardware clears the opening. A 24×48 single-hung rarely passes because half the window stays closed. Your inspector has the final word. If space is tight, consider a larger casement, a combination unit, or a door with glass that meets emergency exit rules.
How much do 24×48 windows typically cost?
You need real figures to plan.
Expect $120–$450 for the unit only, depending on frame, glass, and operation. Installed totals often land around $280–$900 per window, with wide swings by region and wall finish.
Typical ranges (USD)
| Option | Unit price | Installed ballpark |
| Vinyl single-hung, double-pane | $120–$220 | $280–$520 |
| Vinyl casement, low-E argon | $180–$350 | $380–$700 |
| Fiberglass casement | $280–$450 | $520–$900 |
| Thermally broken aluminum | $200–$380 | $420–$780 |
| Wood clad casement | $320–$480 | $560–$900 |
These are broad averages. Coastal labor, scaffolding, stucco cut-backs, and custom paint add cost. Replacement installs lower exterior labor but can add interior trim work. New-construction adds flashing and siding but yields the best water-control layer.
What factors change 24×48 window pricing?
Two same-size windows can differ by hundreds.
Price moves with frame material, glass package, operation type, color, grids, hardware grade, warranty length, freight, and install complexity. Lock the spec first, then compare bids.
- Frame: Fiberglass and wood clad cost more than vinyl; aluminum needs a thermal break.
- Glass: Low-E, argon, triple-pane, laminated, and tempered all add layers and weight.
- Operation: Casement and awning carry more hardware than sliders or single-hung.
- Color: Dark exteriors need higher-grade films or coatings.
- Grids: Simulated divided lites cost more than between-glass grids.
- Install: Brick and stucco require careful flashing; interior tile complicates trim.
- Warranty: Longer and clearer terms often cost a bit more up front but save later.
Can I DIY install a 24×48 window?
DIY is possible if you plan and seal well.
Yes. Many homeowners can DIY a 24×48, especially replacements. Work slow. Keep the sill level, the frame square, and the seal continuous. Call a pro if you see rot or mold.
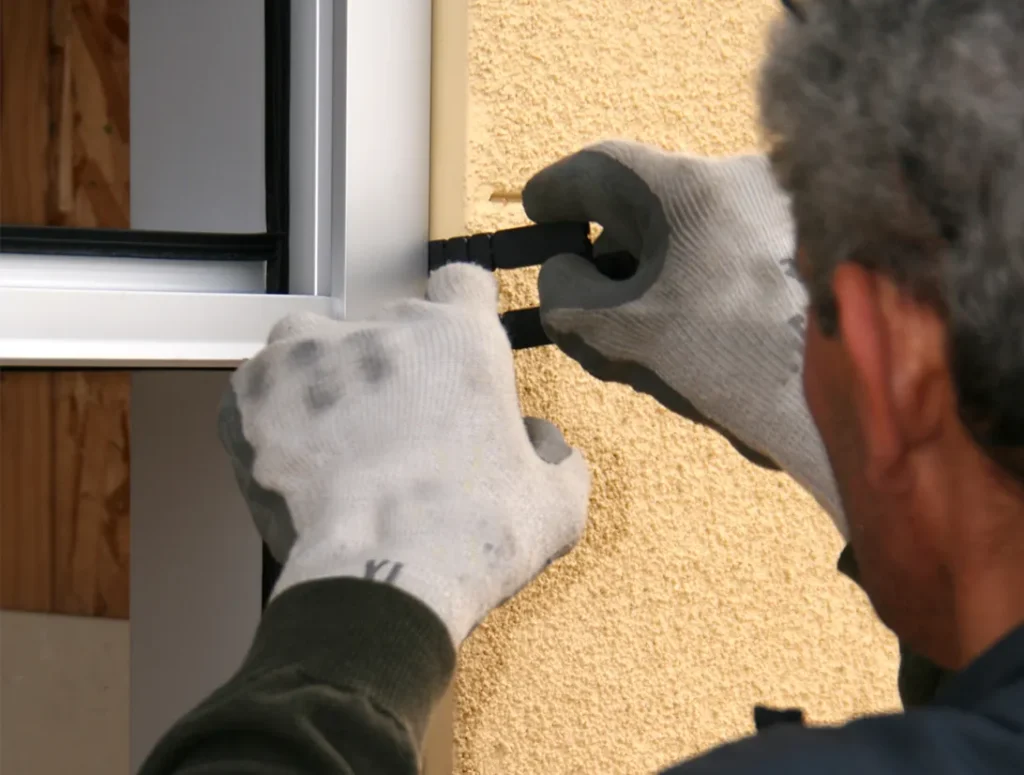
Basic steps (replacement)
- Measure three widths and three heights; order to the smallest.
- Remove sashes and stops; clean the frame.
- Dry-fit the unit; shim the sill flat.
- Apply exterior sealant beads to the frame.
- Set the unit; verify level, plumb, and equal diagonals.
- Fasten per the manual; do not overtighten.
- Insulate gaps with low-expansion foam and backer rod.
- Reinstall stops and run a clean interior bead.
When DIY is risky
- Crumbling sill, dark stains, or soft wood.
- Brick or stucco that needs cut-backs.
- Second stories without safe access.
A careful install beats a fancy product. If you are unsure, hire a pro for the first window and copy the method for the rest.
What flashing and sealing for 24×48 installs?
Water needs a planned path out.
Use a sill pan or peel-and-stick sill flashing turned up the jambs. Shingle-lap jambs over sill, then head over jambs. Sealant is backup, not the main defense.

Sequence that works
- Sill pan: Pre-formed or membrane; add a back dam.
- Jambs: Vertical strips that overlap the sill by 2″.
- Set unit: Bed the fin in a thin continuous bead.
- Head: Cap flashing or membrane over the fin.
- WRB: Lap from top to bottom like shingles.
- Interior: Backer rod + low-expansion foam; finish with a neat bead.
Do not tape across the bottom fin in wet climates; leave a drain path. For finless replacements, rely on slope, back dams, and careful perimeter sealant. Follow the maker’s manual for warranty protection.
Are custom grids and screens available for 24×48?
Style and function can live together.
Yes. Internal grids are easy to clean. Simulated divided lites give true shadow lines. Full or half screens, and fine-mesh screens for tiny insects, are common options.
Internal grids sit between panes and never collect dust. SDLs glue to both sides of the glass and may tweak U-factor slightly. For screens, fiberglass is common; aluminum resists pets; ultra-fine meshes block gnats but cut airflow a bit. If you plan shades, confirm daylight opening and screen track depth so locks and shade brackets do not clash.
What warranties cover 24×48 window failures?
Paper protects you when time has passed.
Look for 10–20 years on insulated glass against fogging, 5–10 years on frames, and 1–2 years on finish and hardware. Read who pays freight and how fast claims move.

Checklist
- Glass seal failure coverage and proration rules.
- Frame warp tolerance (e.g., ≤ 1/8″ over height).
- Hardware finish limits near coastal air.
- Transferability to the next owner.
- Claim steps and response time (aim for 72 hours or less).
Clear terms show confidence in materials and quality control. Keep invoices and photos of labels; they speed any claim.
Conclusion
Know the real size, frame the right opening, choose materials for your climate, and seal in layers. Do this, and a 24×48 window installs fast, stays tight, and keeps comfort steady year-round.