A kitchen island should feel easy, not fussy. The wrong height makes prep awkward, seating tight, and traffic clumsy.
We are a one-stop building-materials partner based in Foshan, serving overseas projects. We help homeowners, contractors, designers, developers, and builders match kitchens, wardrobes, bathrooms, doors, windows, tiles, lights, flooring, and wall panels into one coordinated set. We also offer interior and façade 3D design, full-style matching, export logistics, and after-sales support. Tell us your plan, and we turn it into a clear material list and a shipped solution.
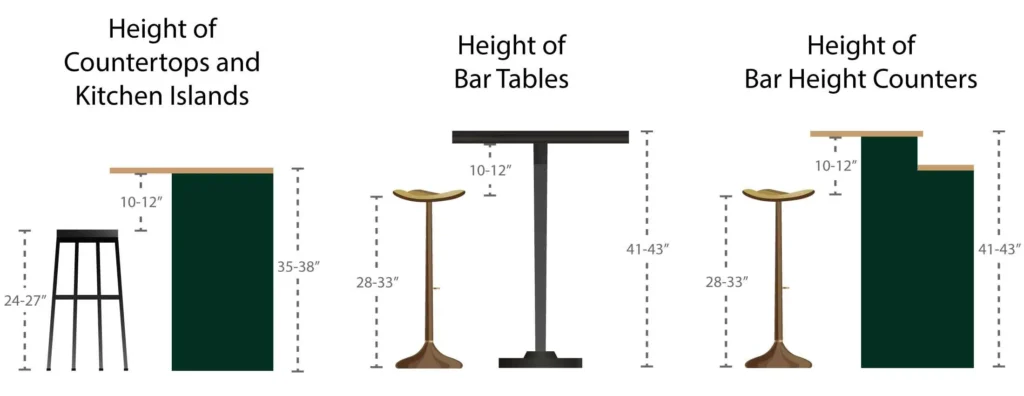
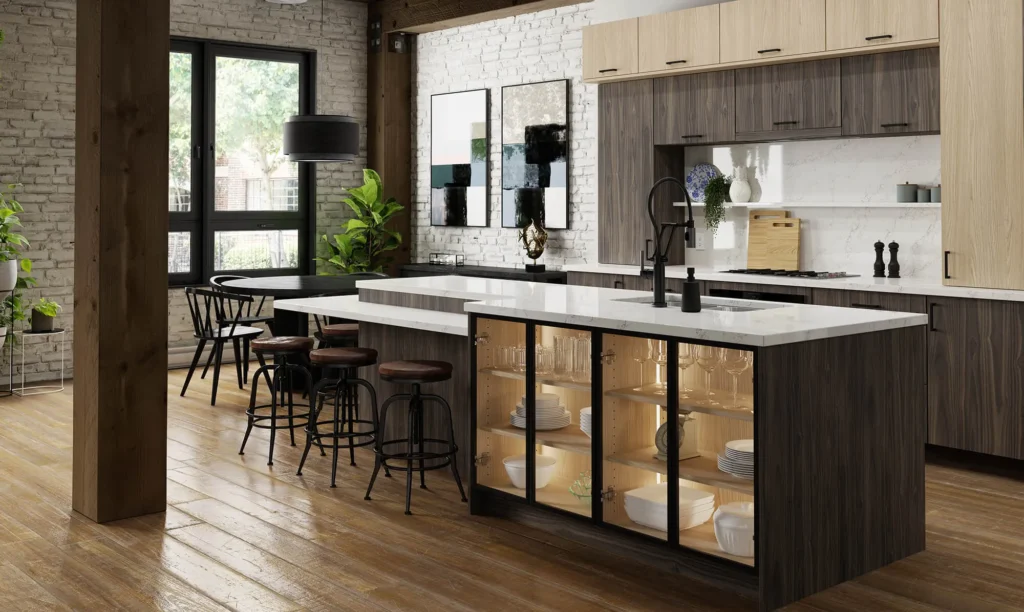
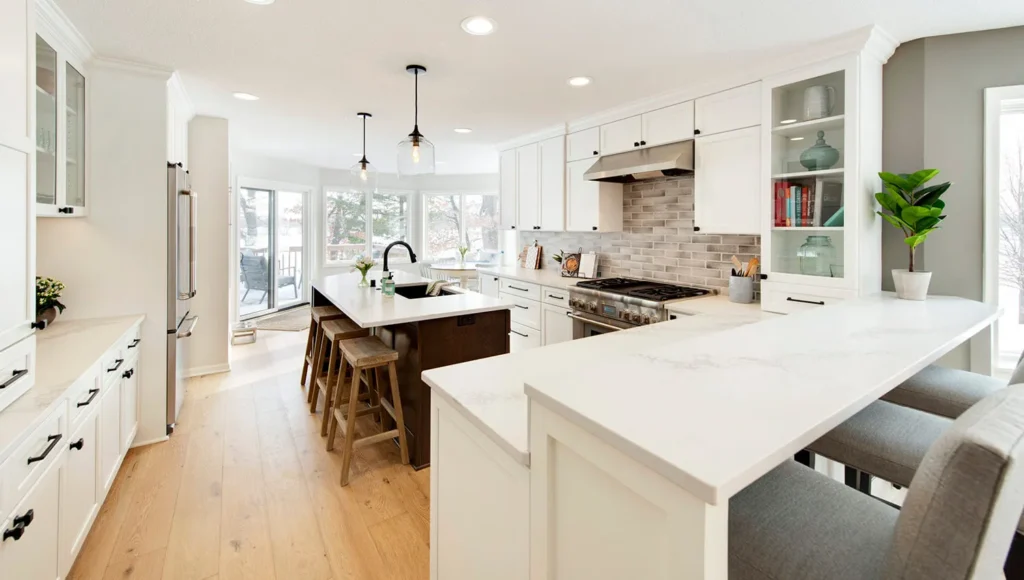
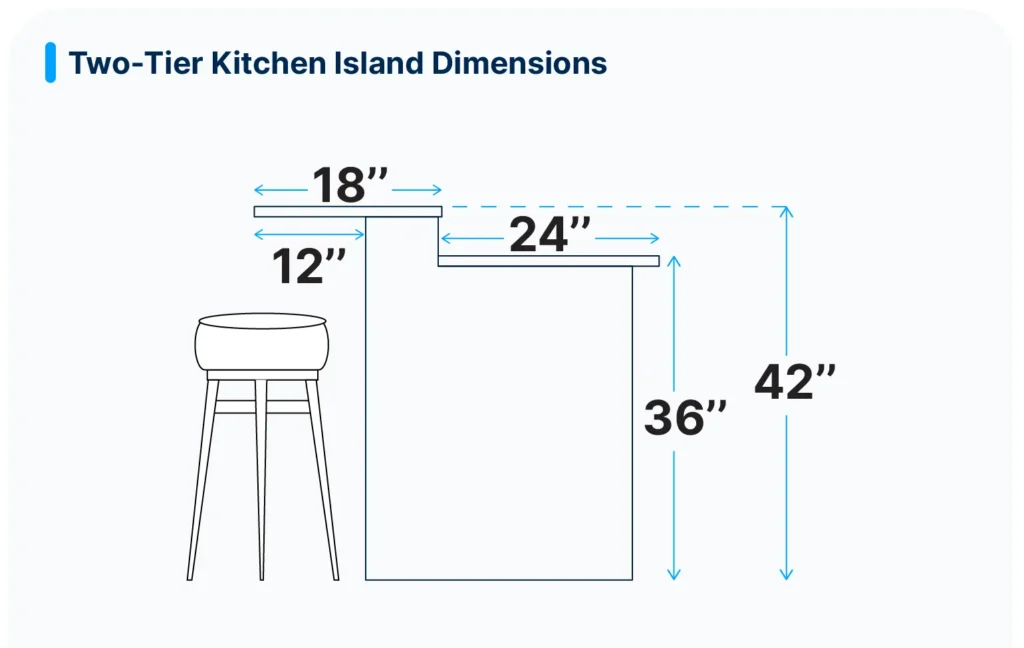
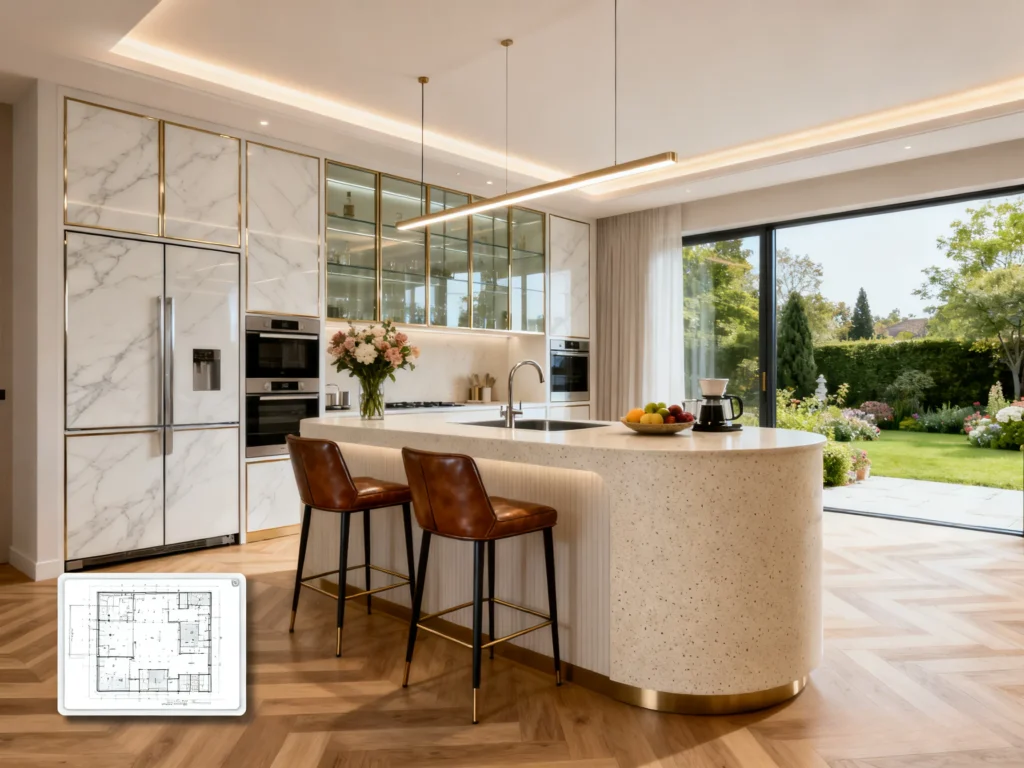
Most homes choose a 36-inch island for prep and daily meals. A 42-inch bar height suits casual seating and visual separation. Dual-height designs blend both, with clear zones for cooking and sitting.
Height is only the first choice. Space, overhang, stools, and workflow matter too. Use the questions below to move from idea to measurements you can build with.
What is the standard kitchen island height?
A kitchen works better when the main surface matches the way you cook and sit. The wrong height causes strain, spills, and clutter.
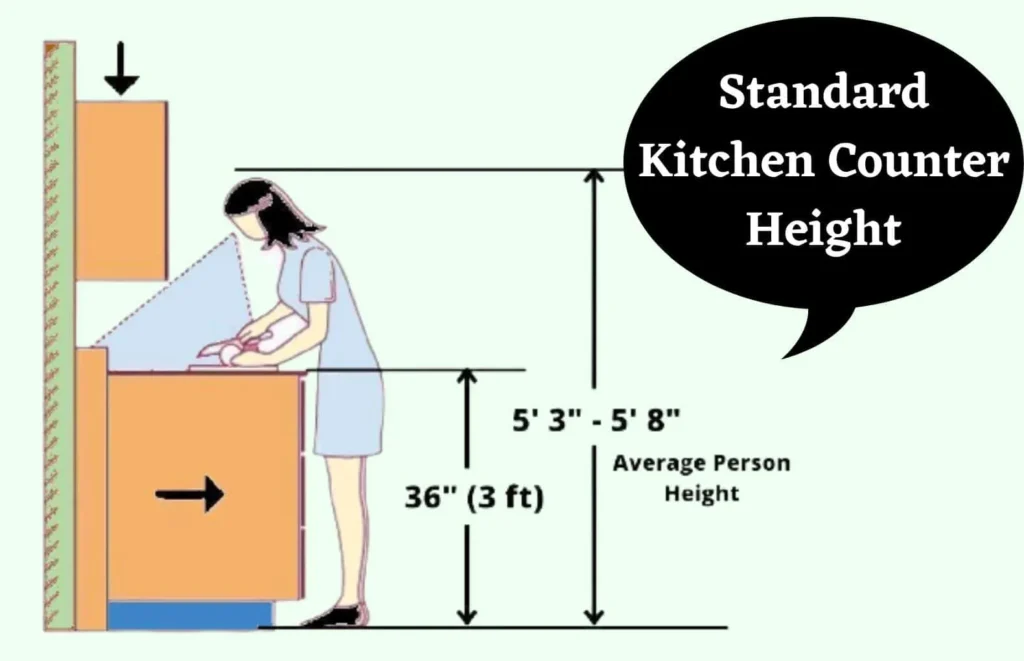
Most islands are 36 inches tall because that height supports daily prep and basic seating. If you host often or want a split look, you can add a 42-inch bar section for raised seating and subtle separation.
Go deeper
For most people, a 36-inch surface lines up with the elbow at a relaxed angle. That keeps wrists neutral and shoulders easy during chopping and mixing. In simple terms, it is good ergonomics.
If you are tall or short, test with a temporary mock-up: set a board on boxes, stand in cooking shoes, and “prep” for a few minutes. If your shoulders lift or your back bends, adjust an inch up or down until your arms feel natural.
A 42-inch island top, often called bar height, adds a social edge. It keeps snacks, drinks, and laptops up and away from the prep mess. It also hides some clutter from the living area. But it can be too high for heavy chopping and dough work. If you want the bar feel without losing prep comfort, try a split design: 36 inches for the cook zone and 42 inches for guests. This layout also lets you run outlets, USB, or a shallow shelf on the raised side to keep the main top clean.
If you seldom sit at the island, keep a full 36 inches. It keeps life simple, lowers cost, and expands usable prep space. If your kitchen opens to a living room and you want a subtle visual break, a 42-inch section can do that without a wall.
How do counter and bar heights differ?
The six-inch jump from 36 inches to 42 inches changes posture, sightlines, and use. That shift affects both prep and seating.
Counter height (36 inches) favors cooking and daily work. Bar height (42 inches) favors casual seating and clutter control. If you pick one, pick for the task you do most.
Go deeper
Think in three angles—shoulders, hips, and knees. At 36 inches, most users can chop with elbows bent around 90–110 degrees. At 42 inches, elbows open more, which is fine for sipping, typing, or leaning, but not ideal for firm knife work. A higher top also blocks some view of spills and tools, which looks cleaner from the living room.
Consider appliances and views. A raised section can hide a sink bowl from seating areas. It also protects guests from splash. On the flip side, if you have a scenic window or want one broad slab of stone, a single 36-inch plane reads calmer and more modern.
Noise and zoning matter too. Bar height positions seated faces slightly higher. That helps conversation across a sofa or dining table. If the island is the family desk, raised height can feel more like a perch than a workstation. In that case, 36 inches with supportive stools may be better for long sessions.
How much overhang do you need for seating?
Without enough overhang, knees hit the cabinet and people lean forward. Too much overhang needs support brackets.
Plan 10–12 inches of overhang for counter-height seating. Plan 12–15 inches for bar-height seating. Add hidden brackets if the stone cantilevers far.
Go deeper
Overhang sets comfort. Less than 10 inches forces a forward hunch. Around 12 inches lets most adults sit with shins clear and heels under the stool. Above ~15 inches you usually need steel brackets or corbels to support the slab, especially with dense materials like quartz or stone.
Use this simple mapping:
| Seating height | Typical overhang | Notes |
| 36″ counter seating | 10–12″ | Works for quick meals and kids’ homework |
| 42″ bar seating | 12–15″ | Better knee room; check bracket needs |
| Accessible seating | 15–18″ | Plan structure; coordinate with base framing |
Measure real knees. Sit on your chosen stool, measure from the front seat edge to the kneecap, then add 1–2 inches. That number is your target overhang. Large stools with arms need more overhang. Backless stools tolerate a bit less because people perch closer to the edge. If you use thick waterfall edges, remember the vertical panel can limit foot room. In small kitchens, a 10-inch overhang with narrow seats may fit better and still be fine for short stops.
What stool height matches each island height?
The right stool height keeps thighs level and forearms easy. The wrong one pinches knees or raises shoulders.
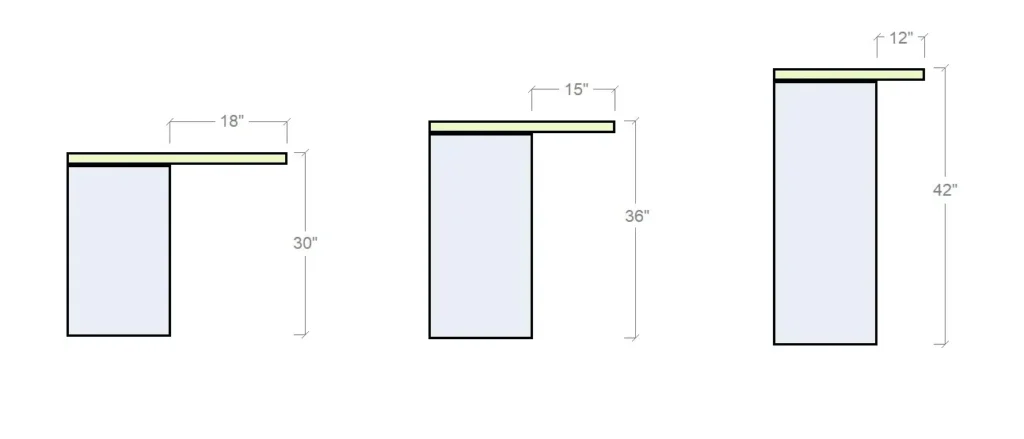
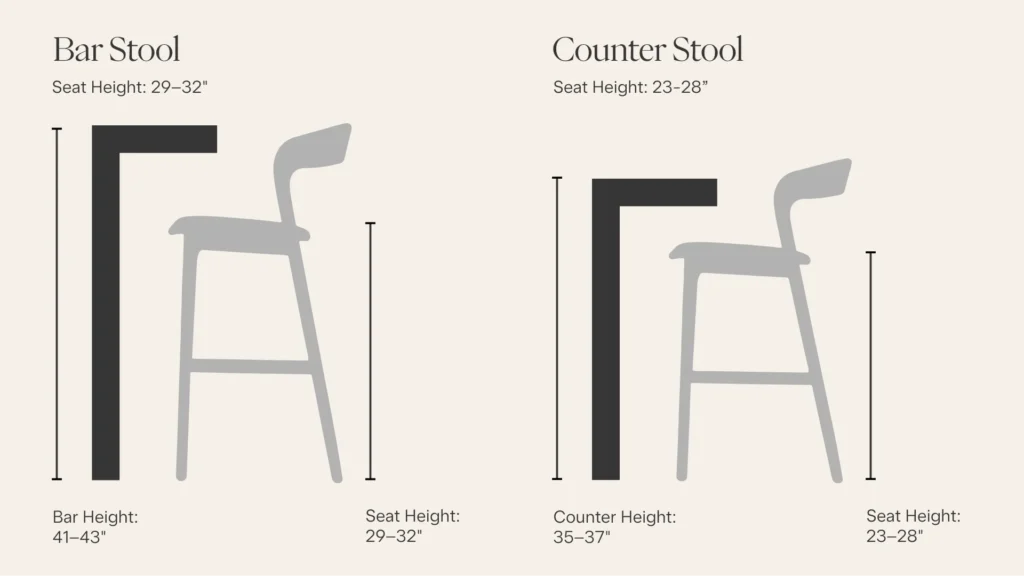
Pair 24–27-inch stools with 36-inch counters. Pair 28–33-inch stools with 42-inch bars. Keep 9–12 inches between seat top and underside of the counter.
Go deeper
Seat-to-counter clearance matters more than labels. “Counter stool” and “bar stool” are broad terms. Always measure the actual stool seat and the underside of the finished top, not just the stone thickness. If you add a 1-inch apron or a support rail under the stone, you reduce knee space.
Use this quick table:
| Island height | Stool height | Clearance target | Good for |
| 36″ counter | 24–27″ | 9–12″ | Prep + quick meals |
| 42″ bar | 28–33″ | 9–12″ | Casual seating, social zones |
If people in your home vary in height, aim for the middle of each stool range and choose stools with a footrest bar. Test before buying in bulk. Sit, slide in, and simulate a meal. If you feel your knees press or your elbows shrug up, adjust stool height or overhang. For kids, a lower seat with a stable footrest reduces fidgeting.
How much clearance around an island is ideal?
Tight aisles slow cooking and trap chairs. Oversized aisles break the workflow.
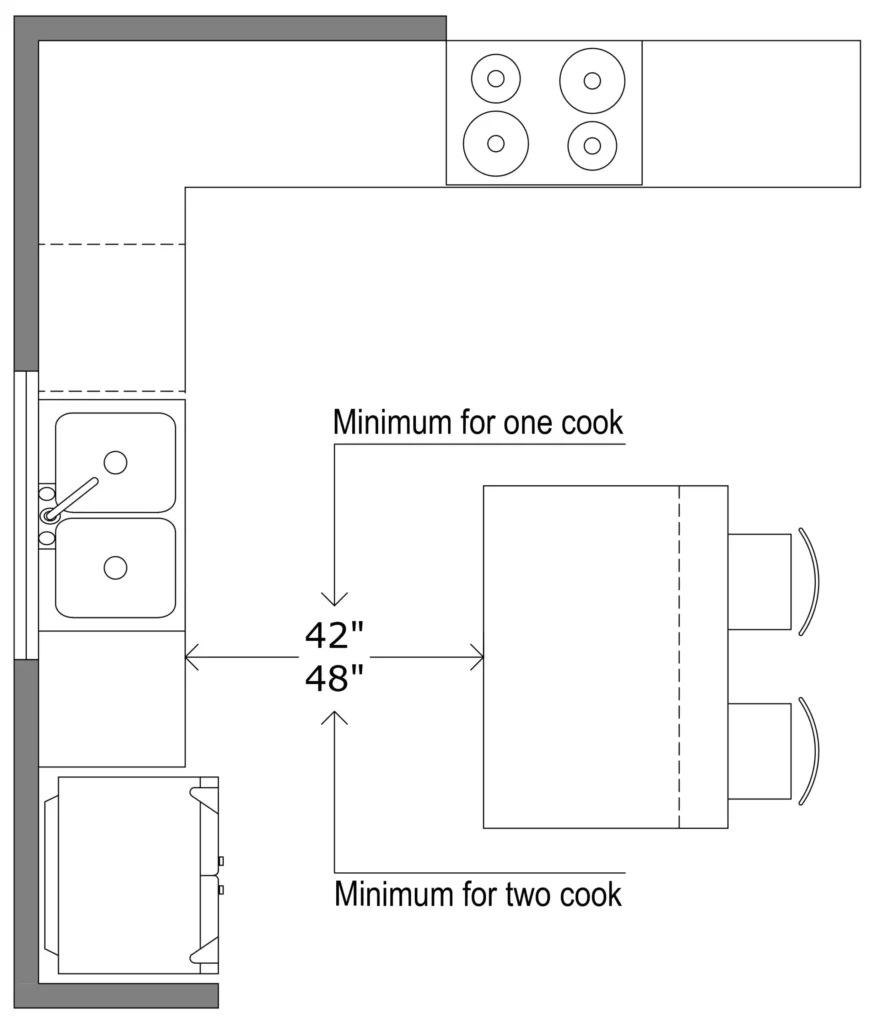
Plan at least 36 inches in tight kitchens and 42–48 inches in active cook zones. Wider clearance supports two cooks and open appliance doors.
Go deeper
Clearance is the backbone of flow. You want enough space to pass, pivot, and open doors without collisions. Keep 42–48 inches between the island and the main run if you cook daily or share the space. In a narrow kitchen, 36 inches can work if doors and drawers do not clash across the aisle.
Think about the classic kitchen work triangle. The sink, cooktop, and fridge should form a short path with no island corners blocking the walk. Leave extra space where doors swing into the aisle: oven, dishwasher, and fridge. A full-width oven door and a cook at the same time need around 48 inches to be safe.
For seating sides, add a chair zone. People need 18–24 inches to push back and stand. That means a wall behind stools often wants 42–48 inches from counter edge to wall, not just to the cabinet base. In open plans, mark the stool footprint on painter’s tape and rehearse “get up and go” moves. If chairs jam into a column or sofa arm, adjust the island length or move the seating to the short side.
Should you mix two heights on one island?
A split island can solve prep vs. seating. It can also add cost and bulk.
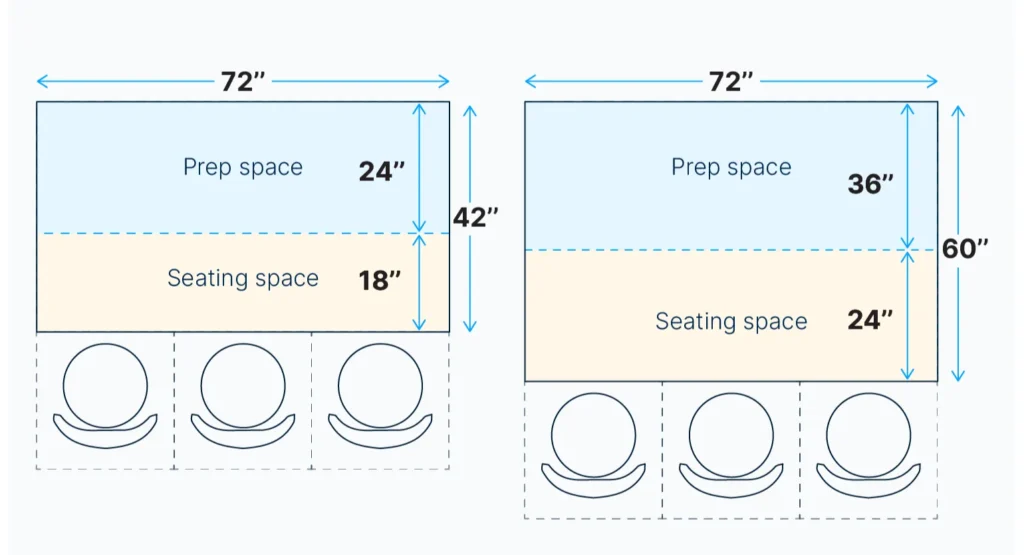
Use a 36-inch prep zone and a 42-inch seating ledge when you want clear functions and a tidy view to the living area.
Go deeper
A dual-height island adds a low “workbench” and a high “perch.” The raised plane hides sink clutter, protects guests from splash, and defines a social edge in open plans. It also creates a natural spot for outlets or a slim shelf. The trade-offs are seams, extra supports, and a thicker visual mass. If your room is modest, a tall back may feel heavy.
Plan the step carefully. A 6-inch difference is standard. Keep the prep section at least 24 inches deep so cutting boards and mixing bowls sit fully on the surface. On the bar side, give 12–15 inches of overhang for knees, then check bracket needs. Tie both levels with one material if you want calm, or mix finishes if you want contrast.
Mind corners and corners. The raised plane can trap grease if it sits behind a cooktop. It can also block views of children in the living room. In that case, a single 36-inch height may serve you better with taller, supportive stools. As always, mock it up with cardboard to see the real-life scale before you commit.
Which height works better for meal prep?
Prep means force and control. Seating means rest and chat. Match the height to the verb.
Choose 36 inches for most prep tasks and baking. Choose 42 inches if seating is the main goal and heavy chopping moves elsewhere.
Go deeper
Sharp knives, firm boards, and heavy bowls all benefit from a lower stance. At 36 inches, wrists stay neutral and shoulders stay low. You can put weight into a cut without lifting elbows. If you bake, a slightly lower section (33–34 inches) is even better for rolling dough, though that is a special-case panel and not always needed.
If your island is a snack bar first, 42 inches shines. People lean, sip, and place plates at a comfortable mouth level while standing. Guests can stand on one side while you prep on the other if you keep tools and splash contained. Add task lighting above the prep zone and softer pendants above the bar edge to support both moods.
Storage also plays a role. A full 36-inch slab fits wide trays and large boards without seams. A stepped design may break the surface into two smaller zones. If you want a big single slab for pastry or photography, keep one height and avoid cut lines.
Does bar height hide kitchen mess better?
Open plans show everything. A raised ledge can soften that.
A 42-inch bar hides sink bowls and chopping chaos from a living room view. It also creates a casual boundary without a wall.
Go deeper
Sightlines make or break a great room. When you sit on a sofa, your eye skims a higher plane first. A 42-inch ledge intercepts dish stacks, wet sponges, and cords. It also makes a natural “drop zone” for mail and keys away from the cook’s elbow.
But hiding can become blocking. A tall back can interrupt a view to a garden or make a small room feel closed. If your sink faces a window and the living room sees only the clean outer edge, a single 36-inch top stays lighter and easier to clean. If you still want partial screening, use a shallow tool rail or a plant shelf at the back of a 36-inch island. You get a hint of separation without a full wall.
Remember behavior. A raised ledge invites perched chats and phones. That is great for hosting. It is also a magnet for clutter if no one clears it. Add one slim drawer for pens and chargers and one small tray for keys to keep the top open.
What knee space and per-seat width feel comfortable?
Crowded stools turn meals into elbow fights. Tight knees push people away from the edge.
Target 9–12 inches from seat to underside of top. Allow 22–24 inches of width per seat so everyone can move.
Go deeper
Comfort is simple math. First, clearance: measure the seat top height and the underside of the counter. Keep 9–12 inches between them. Less squeezes thighs. More lifts shoulders. Second, per-seat width: 22–24 inches lets most adults eat without bumping elbows. Narrow stools can go to 21 inches if meals are brief.
Use a quick planning table:
| Factor | Target | Why it matters |
| Seat-to-counter clearance | 9–12″ | Thighs fit; shoulders relax |
| Width per stool | 22–24″ | Fewer elbow bumps |
| Edge radius | Softened | Kinder on forearms |
| Footrest | At ~⅓ of leg length | Reduces sway and fatigue |
Edge shape helps too. A small eased edge is kinder than a sharp 90-degree corner. It saves sleeves and wrists. If you have a waterfall end panel, test where shins hit when you slide in. For long meals, back support and a real footrest matter more than anything else. Choose stools as carefully as you choose stone.
Conclusion
Pick the height for the task, then size the overhang, stools, and aisles to match. Test with tape and cardboard before you build.
Final CTA
If you are planning a new island or a full kitchen set, send us your floor plan. We will sketch layout options, match styles across rooms, and price materials in one list. Want to get started? Send the floor plan and we will handle the rest.
FAQ
What is the standard kitchen island height?
Most islands are about 36 inches tall, which suits everyday food prep and informal seating. Some designs add a 42-inch raised section for bar-style seating.
How much clearance should I leave around a kitchen island?
Plan 42–48 inches in active cook zones. In tight kitchens, 36 inches can work. Ensure doors and drawers can open without clashing.
How much overhang do I need for island seating?
Provide about 10–12 inches at counter height and 12–15 inches at bar height for comfortable knees. Add support if the overhang is large.
What stool height fits a 36-inch counter?
Use stools around 24–27 inches tall. Keep 9–12 inches of space between the seat and the underside of the countertop.
What stool height fits a 42-inch bar?
Use stools around 28–33 inches tall. Test with your specific slab thickness and any aprons to confirm knee room.
What is the minimum size for a small kitchen island?
A functional island can be as small as 2 by 4 feet, but the total island area should stay under about 10% of the kitchen.
Can I mix counter and bar heights on one island?
Yes. Dual-height islands are common. Keep the prep zone at 36 inches and the seating ledge around 42 inches for clear function and comfort.
How much width should I allow per seat at an island?
Allow roughly 22–24 inches per person so elbows have space. Pair this with the right overhang for knees and comfort.